Protein Sample Preparation for NMR Experiments
This tutorial outlines the procedure for preparing protein samples for NMR experiments, assuming the starting material is glycerol-free. If your protein aliquots contain glycerol, please follow the separate glycerol removal tutorial.
The process assumes you are starting with a series of protein aliquots (e.g., 6 × 100 μL, 300 μM assumed) and guides you through:
- Thawing frozen (-80 °C) aliquots and spinning them to remove debris
- Concentration of the protein solution
- Measurement of protein concentration
- Addition of Acetyl-CoA (AcCoA) to achieve a 1:1 molar ratio (if applicable)
- Final transfer into an NMR tube (Shigemi type)
Equipment and Materials
- Fixed-angle centrifuge rotor
- Pipettes (ideally in 100 μL and 200 μL ranges)
- 0.5 mL centrifugal filter unit (3–100 kDa MWCO), placed inside a support Eppendorf tube
- NMR buffer (glycerol-free), e.g.:
25 mM Tris, 300 mM NaCl, 1 mM TCEP, pH 7.5 - Protein aliquots (e.g., 6 × 100 μL, 300 μM assumed)
- Ice box
- NanoDrop spectrophotometer (for concentration measurement — see the separate tutorial)
- D2O solution
- Shigemi tubes
1. Thawing Frozen Protein Aliquots and Spinning them
If your protein aliquots were stored at −80 °C, some protein molecules may become denatured or degraded during thawing. This can trigger a domino effect on the remaining protein molecules, leading to rapid aggregation or contamination that will hamper NMR data acquisition. To prevent that:
- Thaw the samples slowly in a box filled with ice.
- Once they are fully liquid, spin at ≥ 15,000 g and 4 °C for 10 min, then transfer the supernatant to a new tube.
You will probably see a small white pellet left behind (a good sign), which is aggregated protein.
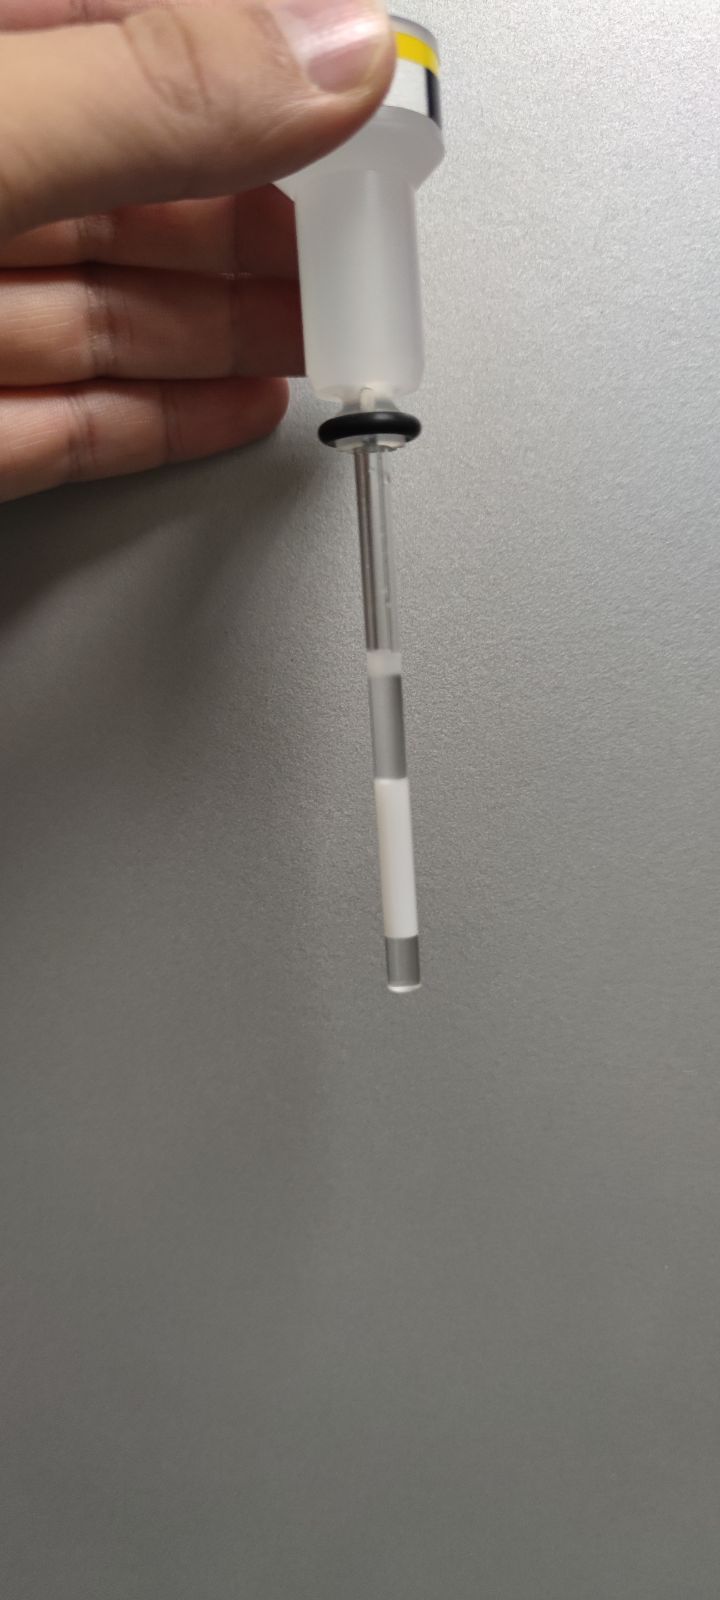
DO NOT OMIT THIS STEP, otherwise your NMR sample may soon become unsuitable for measurements. Below is what happened to us when we skipped the spin at ≥ 15,000 g and 4 °C for 10 min—the protein (25 kDa) completely aggregated in just 3 hours (white part of the NMR tube)!
2. Concentration of the Protein Solution
The goal of this step is to reduce the combined volume of your aliquots (~600 μL) to approximately 350 μL, which is enough to fill a Shigemi NMR tube (~300 μL) while providing some extra volume for measurement and transfer loss.
🔹 Step 1: Pre-wash the Filter Unit
Since the filter unit lacks volume markings, you will need to add one manually:
- Pipette 350 μL of NMR buffer into the filter unit.
- Use a marker to draw a line at the 350 μL level. This mark will serve as a reference for future volume adjustments.
- Pipette additional 150 μL into the filter unit to reach its full capacity.
- Insert the unit into the centrifuge rotor.
- Centrifuge at 8,000 × g for 10 minutes at 4 °C.
- If the buffer still remains in the filter unit, centrifuge again for 5–10 minutes until the unit is empty.
🔹 Step 2: Pool the Protein Aliquots
- Remove 6 protein aliquots from the freezer and thaw them on ice for approximately 10–15 minutes.
- Once thawed, pipette the contents of the first five aliquots directly into the sixth one.
- Vortex the tube briefly to ensure thorough mixing.
- You should now have approximately 600 μL of sample, accounting for minor pipetting losses.
🔹 Step 3: Concentrating the Sample
In this step, you will use the 350 μL mark made earlier to estimate the volume during concentrating.
- Pipette 500 μL of your protein sample into pre-washed filter unit.
- Centrifuge the sample at 8,000 × g for 1 minute at 4 °C.
- After each spin, check if the volume in the filter unit is above mark.
- If the volume is still above the target, continue centrifugation in 1-minute increments.
- Stop once the volume matches the reference level.
⚠️ Avoid overdrying the sample — stop slightly above the target volume if in doubt.
💡 If your total sample volume exceeds the filter unit’s capacity (e.g., ~600 μL total), process the remaining volume like this:
- After reducing the first 500 μL to ~400–450 μL, add the remaining ~100 μL directly into the same filter unit.
- Continue centrifugation in 1-minute increments as before.
- This ensures that all of your protein sample is retained and concentrated together without needing a second filter unit.
-
Place the filter unit with the concentrated solution in the NMR buffer on ice and head to the NanoDrop station to measure the concentration.
3. Concentration Measurement
Measure the concentration of your sample by following the NanoDrop tutorial. This concentration will serve as a starting point for calculating how much AcCoA needs to be added to achieve the desired ratio between protein and cofactor (if needed).
4. Final NMR Sample preparation
After the concentration measurement, transfer 300 μL of the concentrated sample into an Eppendorf tube. This step establishes the volume of your protein stock for calculating how much AcCoA and D2O to add. If you need to add AcCoA, follow Step 1; otherwise, skip ahead to Step 2.
🔹 Step 1: Calculation of the added volume
To determine how much AcCoA stock to add to your sample to reach a 1:1 molar ratio (AcCoA:protein), use the formula below.
V_{AcCoA}~[μL] = \frac{C_{protein}\times V_{protein}\times 10^{-3}}{C_{AcCoA}}
Where:
- VAcCoA = volume of AcCoA to add (in μL)
- Cprotein = protein concentration (in μM)
- Vprotein = protein sample volume (in μL)
- CAcCoA = AcCoA stock concentration (in mM)
⚠️ Units required for this formula:
- Protein concentration in μM
- Protein volume in μL
- AcCoA stock concentration in mM
- Resulting AcCoA volume in μL
💡 Example Calculation
Assume you have:
- Cprotein = 400 μM
- Vprotein = 300 μL
- CAcCoA = 8 mM
Plug the values into the formula:
V_{AcCoA} = \frac{400 × 300 × 10^{-3}}{8} = \frac{120}{8} = 15 μL
✅ Result: Add 15 μL of 8 mM AcCoA to your protein sample to reach a 1:1 molar ratio.
🔹 Step 2: Addition of D2O
To enable frequency locking during NMR acquisition, add D2O to the sample to reach a final content of 5–10%. A common choice is 7%.
Use the following formula to calculate the volume of D2O to add:
V_{D2O}~[μL] = \frac{p \times V_0}{1 - p}
Where:
- VD2O = volume of D2O to add (in μL)
- V0 = current sample volume before adding D2O (in μL)
- p = desired D2O percentage as a decimal (e.g. 0.07 for 7%)
💡 Example Calculation
Let’s say:
- Current volume = 315 μL (300 μL protein + 15 μL AcCoA)
- Desired D2O fraction = 7% (i.e. p = 0.07)
Plug the values into the formula:
V_{D2O}~[μL] = \frac{0.07 \times 315}{1 - 0.07} \approx 23.7 μL
✅ Result: Add 23–24 μL of D2O to your sample to reach ~7% D2O content.
This gives you a final volume of ~339 μL, suitable for Shigemi tube preparation.
🔹 Step 3: Final Steps
- Vortex the tube briefly to ensure thorough mixing.
- Transfer the sample into the Shigemi tube using the glass Pasteur pipette.
- Cap the Shigemi tube.
- Spin the Shigemi tube on the table rotor to get rid of the bubbles.
The following steps should be performed by NMR facility personnel but are included here for completeness:
- Insert the plunger so the meniscus is 2–3 mm below the rim. Be careful, no bubble must be present in the tube.
- Cap, clean the exterior, and load the tube into the spectrometer.